


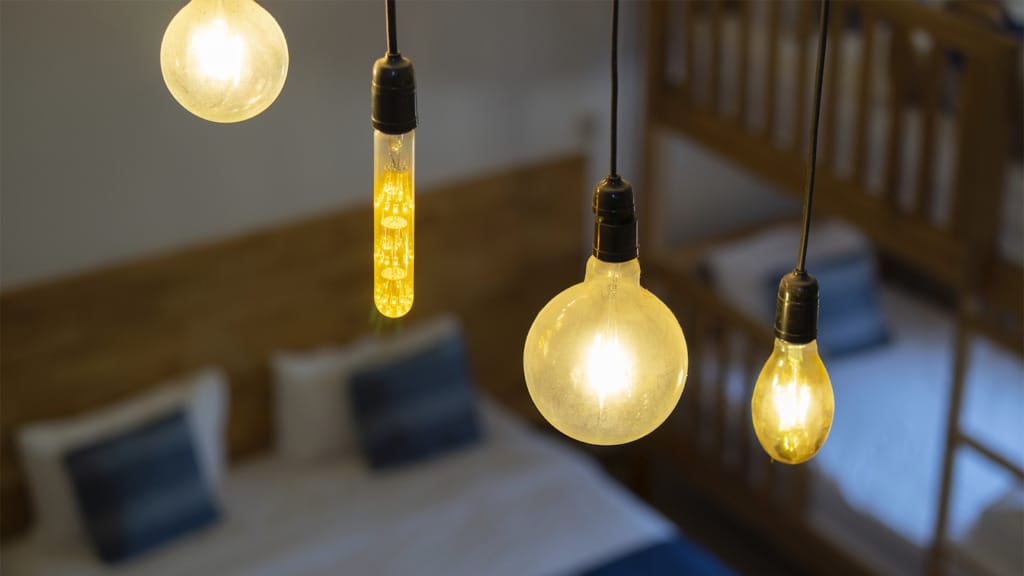
Have you ever stepped back to admire a room you’re about to photograph, only to discover it looks flat, orange or shadowy on camera? The culprit might not be your décor or your phone; it’s likely the light bulbs. Selecting the best light bulbs for photos can make the difference between a listing that looks gloomy and one that looks bright, spacious, and inviting. When staging a home or capturing your own interiors for social media, understanding color temperature, brightness, flicke,r and color rendering will help you choose bulbs that make every angle shine.
Why the Bulb Matters: Color, Brightness & CRI Explained
Light bulbs vary not only in brightness (measured in lumens) but also in color and quality. Here are the main terms to know:
- Kelvin (K): The color temperature of a light source. Lower numbers (2700 K) emit warm, yellowish light; mid-range values (3000 K–4000 K) are neutral; and higher values (5000 K–6500 K) resemble daylight. The color temperature you choose sets the mood and influences how the camera interprets surfaces and skin tones.
- Lumens: A measurement of brightness. For photography, you need enough lumens to fill the room without overexposing highlights. Aim for roughly 1,000–2,000 lumens per 100 square feet, depending on the room’s natural light and wall colors.
- Color Rendering Index (CRI): A scale from 0–100 that measures how accurately a bulb renders colors. Incandescent and halogen bulbs rate at 100 because they produce a continuous spectrum. High‑quality LEDs can achieve CRI scores of 90 or above. For photo‑ready lighting, look for bulbs labeled “90+ CRI” or “95 CRI” so that reds, skin tones and wood tones appear natural on camera.
- Flicker: Cheap LEDs and some fluorescent lights can flicker at frequencies invisible to the eye but visible to a camera shutter. Flicker can create banding in photos and strange pulsing in videos. Always check packaging for “flicker‑free” or test bulbs with your smartphone’s slow‑motion setting.
Kelvin Temperature Cheat‑Sheet for Every Room
When staging or photographing interiors, match the color temperature to the room’s purpose and desired feel. Use the chart below as a quick guide:
| Temperature (K) | Mood & Use | Effects on Photos |
| 2700 K | Warm & cozy living rooms | Creates a soft, inviting glow but can make photos appear yellow or orange; use as accent lighting rather than the main source. |
| 3000 K | Inviting bedrooms | Slightly cooler than 2700 K; works well for sleeping areas and reading nooks. Provides warmth without overwhelming color accuracy. |
| 4000 K | Neutral kitchens & baths | A balanced white light that flatters countertops and tile; excellent for cooking and grooming while keeping colors true. |
| 5000–5500 K | Daylight for true color accuracy | Mimics midday sunshine; ideal for interior photo lighting, product shots and real‑estate photography; reduces yellow and blue casts. |
2700 K: Warm & Cozy Living Rooms
A 2700 K bulb emits a warm, amber glow similar to candles or traditional incandescent lamps. This warmth creates a relaxing ambiance in living rooms and dens. However, cameras often exaggerate yellow tones, making walls and furniture appear dingy. If you love cozy lighting, keep these bulbs in accent lamps or sconces while relying on cooler photo‑ready lighting for your main shots.
3000 K: Inviting Bedrooms
Bulbs around 3000 K are a popular choice for bedrooms and reading nooks. They provide a golden glow without the heavy orange cast of 2700 K. When photographing these spaces, supplement the warm light with a daylight bulb or adjust your white balance to prevent skin tones from appearing too rosy.
4000 K: Neutral Kitchens & Baths
Kitchens and bathrooms benefit from crisp, neutral light. At 4000 K, the glow is neither too warm nor too cool. White cabinets, marble countertops, and stainless steel appliances look clean, and personal grooming is easier because skin tones remain accurate. This temperature also plays nicely with both warm and cool accent bulbs in adjacent rooms.
5000–5500 K: Daylight for True Color Accuracy
Most staging photography lights fall between 5000 K and 5500 K, often labeled “daylight.” This range closely resembles midday sunlight, which our brains interpret as neutral white. Using daylight-balanced bulbs eliminates orange and green casts, making colors pop without looking oversaturated. Daylight bulbs with a CRI of 90 or higher are essential for interior photo lighting because they reveal accurate skin tones, paint colors and fabric textures.
LED vs CFL vs Halogen: Which Wins for Staging Photos?
There are three common types of bulbs you’ll encounter when shopping for staging photography lights: LED, CFL, and halogen. Each has advantages and drawbacks.
LED (Light Emitting Diode)
Pros:
- Highly energy efficient and long‑lasting (often 15,000–25,000 hours).
- Available in a wide range of color temperatures, including 5000 K daylight and 4000 K neutral.
- High‑quality LEDs can achieve CRI ratings above 90, providing excellent color accuracy.
- Flicker‑free LED bulbs use advanced drivers to eliminate strobing.
- Dimmable options make it easy to fine‑tune brightness.
Cons:
- Low‑cost LEDs may flicker or have CRI scores below 80, causing dull or unnatural colors.
- Some models emit a blue cast when dimmed; pairing them with warm accent lighting helps balance the effect.
CFL (Compact Fluorescent Lamp)
Pros:
- More energy efficient than incandescents, with moderate lifespans.
- Available in various color temperatures.
- Photo quality fluorescent tubes and bulbs (sometimes used in softboxes) can offer CRI ratings over 90 with flicker‑free ballasts.
Cons:
- Many household CFL bulbs have CRI scores around 80, leading to green or magenta color casts.
- They can flicker and hum if the ballast is cheap or old.
- CFL bulbs take time to reach full brightness and are more fragile than LEDs.
Halogen (Tungsten)
Pros:
- Halogen bulbs are a type of incandescent that operates around 3200 K with a CRI of 100, so colors appear rich and accurate.
- They emit a warm yet clear light that flatters skin tones and wood furniture.
- Excellent for accent lighting and highlighting features.
Cons:
- Run hot and consume more energy than LED or CFL bulbs.
- Shorter lifespan and higher wattage requirements.
- Warm color temperature can cast an orange tint if used as the only light source.
For most staging and real‑estate photos, high‑CRI LEDs win. They deliver daylight-balanced light without the heat, flicker, or greenish cast of cheaper options. CFL bulbs are acceptable in a pinch if they’re rated for high CRI and paired with flicker‑free ballasts. Halogens work best as accent bulbs to introduce a touch of warmth.
Top 5 Bulbs That Make Interiors Camera‑Ready
Looking for specific bulbs to stock your kit? The following five options offer excellent color accuracy and a balance of brightness and efficiency. These suggestions are affiliate‑free and can be found at many hardware stores or online retailers.
Philips LED Flicker‑Free 5000 K (95 CRI)
These 5000 K A19 bulbs provide about 1,100 lumens of daylight‑balanced light with a CRI of 95. The flicker‑free driver ensures smooth video and stills, while the frosted finish diffuses light for softer shadows. Expect to pay around $15–$20 for a two‑pack.
SANSI 5000 K 800 lm High‑CRI LED
SANSI’s 5000 K bulbs deliver 800 lumens and a CRI above 90. They have a ceramic heat sink for long life and emit a crisp white light for photo‑ready lighting. A four‑pack costs approximately $25.
Torchstar 90‑CRI A19 Daylight LEDs (4‑pack)
These budget‑friendly bulbs offer 5000 K daylight color with 800 lumens and a CRI of 90. They’re ideal for everyday staging and work well in table lamps or overhead fixtures. Expect to pay around $15 for four bulbs.
Smith‑Victor 45 W High‑CRI LED Flood
For rooms that need a serious light boost, this 5600 K flood bulb produces roughly 3,200 lumens with a CRI of 95. Use it in a clamp lamp or softbox to mimic a studio light; it stays cool to the touch and lasts up to 25,000 hours. One bulb costs about $30.
12Vmonster 2700 K Halogen (Accent Warmth)
When you need a warm accent to complement daylight bulbs, a 2700 K halogen provides rich, flicker‑free light. These bulbs emit 500–700 lumens and render colors beautifully thanks to their CRI of 100. They do get hot, so pair them with a dimmer or use them in fixtures with proper ventilation. A pack of four runs around $10–$12.
By stocking a mix of these bulbs, you can tailor your setup to each room’s needs while maintaining color accuracy and brightness.
How to Mix Bulbs Without Weird Color Casts
One of the quickest ways to ruin an otherwise beautiful room is to mix bulbs with drastically different color temperatures. To avoid harsh lines or patchy hues in your photos, keep all light sources within about 300 Kelvin of each other. If your overhead fixtures use 4000 K bulbs, swap table lamps to 3700–4300 K to maintain harmony. When combining warm and daylight bulbs for layered ambiance, assign each type to a distinct zone (e.g., task lamps at 5000 K and accent lighting at 3000 K) so they don’t spill onto the same surfaces.
For fine‑tuning, consider using dimmer switches or colored gels (thin sheets placed over bulbs) to adjust the warmth or coolness without swapping out bulbs. Many dimmable daylight LED bulbs maintain their color temperature when dimmed, but some will shift toward blue or yellow. Test each type ahead of time, and set your camera’s white balance manually rather than relying on automatic settings.
Placement & Diffusion Hacks for Smartphone Shoots
Buying the right bulbs is only half the battle; where and how you use them affects your results just as much. Here are inexpensive ways to achieve flattering, even light with your phone or DSLR:
- Bounce cards: Use white foam board, poster board or even a sheet of printer paper to bounce light onto your subject. Position your main light at a 45‑degree angle and place the bounce card opposite it to fill in shadows. This technique reduces harsh contrast and makes skin look smooth.
- Paper lanterns: Suspended paper lanterns create soft, wraparound light. Insert a flicker‑free LED bulb and hang it above or beside your shooting area. The lantern acts as a built‑in diffuser, perfect for highlighting a dining table or reading nook.
- Clamp lamps: A basic clamp lamp fitted with a high‑CRI bulb can be clipped to a bookshelf, chair back or door frame. Aim it toward the ceiling or a white wall to bounce light and soften shadows.
- Sheer curtains or shower curtains: Need instant diffusion? Hang a translucent fabric between your light source and the subject. The material spreads out the light, eliminating hotspots and glare.
- Bounce‑light technique: Place a light behind a piece of furniture and aim it upward. The wall and ceiling act as reflectors, distributing a gentle glow across the room.
These hacks cost less than $20 and allow you to control light direction, softness and coverage without professional equipment.
Common Mistakes That Ruin Real‑Estate Photos
Even the best bulbs can’t save a poorly planned setup. Avoid these common pitfalls when lighting rooms for listing photos or social media shots:
- Relying on one overhead light: Ceiling fixtures often cast unflattering shadows and leave the lower half of the room dark. Supplement with lamps and uplights to create depth.
- Mixing color temperatures: A table lamp at 2700 K next to a 5000 K overhead light creates muddy colors and distracts buyers. Keep your bulbs in the same temperature range.
- Using bulbs with low CRI: Anything below 80 can make walls and furniture look dull. Go for 90+ CRI to ensure accurate color reproduction.
- Leaving bulbs exposed: Visible bare bulbs can cause lens flare and hot spots. Use diffusers, shades or frosted bulbs to soften the light.
- Ignoring flicker: Cheap LEDs and older CFLs may flicker, leading to banding in photos and video. Choose bulbs labeled “flicker‑free” or test them with your camera.
Rental‑Stager Toolkit: 3 Plug‑and‑Play Lighting Kits
For real estate agents and home stagers, having a portable lighting kit in the trunk can save the day. These ready‑made bundles include everything you need for photo‑ready lighting and cost less than $150:
- Daylight Bulb & Lantern Kit (~$60): Four 5000 K high‑CRI LED bulbs, two collapsible paper lanterns and two plug‑in pendant cords. Hang the lanterns above dining tables or kitchen islands to create soft ambient light in minutes.
- Softbox Twin‑Kit (~$120): Two adjustable tripod stands, two pop‑up softboxes and two 45 W daylight LED bulbs with CRI 95. This set provides diffused light for large rooms and easily packs into a carrying case. It’s ideal for photographing living rooms and master bedrooms.
- Ring Light & Clamp Kit (~$50): A 12‑inch ring light with adjustable color temperature (3200–5600 K), smartphone holder, clamp mount and remote control. Perfect for portraits, small vignettes or smartphone video tours. Use it as a fill light when shooting with natural window light.
Each kit is rental‑friendly, requiring no hardwiring. Stash one in your car for open houses and listing shoots, and you’ll never have to rely on dim existing lighting again.
Quick Checklist & Next Steps
Choosing the best light bulbs for photos doesn’t have to be overwhelming. Before your next shoot, run through this checklist:
- Determine the room’s mood and function: Warm, neutral or daylight? Use the Kelvin chart to guide your choice.
- Choose high‑CRI bulbs (90+) to ensure accurate color and flattering skin tones.
- Match color temperatures within 300 K to prevent mismatched hues.
- Ensure flicker‑free performance by selecting quality LEDs or photo‑grade CFLs.
- Layer your lighting with multiple sources instead of relying on a single overhead fixture.
- Diffuse and bounce light using paper lanterns, bounce cards or sheer fabrics.
- Test your setup with a smartphone or camera, adjusting placement and brightness until the room looks even and inviting.
Ready to take your staging skills to the next level? Our team at The Staging Place has curated a detailed photography staging checklist for sellers to complement your new lighting know‑how.
For more quick tips, explore our post on five lighting tricks to brighten a dark listing . With the right bulbs and a thoughtful layout, you’ll capture photos that sparkle and spaces that sell.
FAQs
What is Kelvin closest to natural window light?
The closest match to noon window light is around 5500–6500 K. Bulbs in the 5000 K range mimic midday sun without looking too blue, making them ideal for indoor photography.
Are smart bulbs with RGB a good idea for staging?
Smart bulbs that change to any color may be fun for everyday use, but they’re generally not recommended for staging photos. Stick to adjustable white smart bulbs that let you set precise color temperatures (e.g., 2700 K to 6500 K) and avoid bright saturated colors that cast odd hues on walls and furniture.
How many lumens do I need per 100 sq ft for photos?
A good rule of thumb is 1,000–2,000 lumens per 100 square feet when photographing interiors. Bright, reflective rooms need less; dark finishes and north‑facing rooms need more.
Can cheap LEDs cause flicker in DSLR footage?
Yes. Low‑cost LED bulbs often use inexpensive drivers that flicker at low frequencies, which can create banding in photos and video. Look for bulbs labeled “flicker‑free” or test by filming in slow‑motion. High‑quality LEDs or photo‑grade CFLs with high‑frequency ballasts solve this issue.
Do I change bulbs back after the open house?
High‑CRI daylight bulbs are perfectly suitable for everyday living, so you don’t have to swap them out. In fact, many homeowners prefer the clarity and energy savings of LED bulbs over their older counterparts. If you used specialty softbox lights or studio floods, simply remove them after the shoot and store them for the next staging.